You can use the “Record Sort Expert” to sort the report data. When you sort a report, you can choose by which fields the data is sorted and in what order. To sort the displayed data, you can either click the “Record Sort Expert” button in the Experts toolbar, or you can choose “Report| Record Sort Expert…” from the Menu Bar.
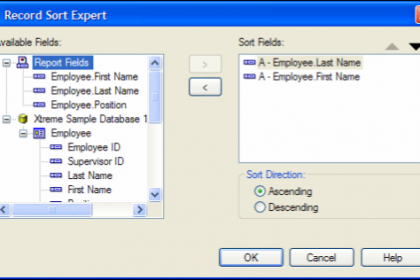
This will then launch the “Record Sort Expert” dialog box. At the left side of this dialog box you will see the listing of “Available Fields:.” You can expand and collapse the listing of fields displayed in the report and fields that only exist in the underlying data tables. You can sort by either set of fields. Fields do not necessarily need to be displayed in a report in order to sort by their values.
Click on the first field by which you want to sort the data in the list of “Available Fields:” and then click the right-pointing arrow button to move a copy of the field over to the “Sort Fields:” list. You can then click on the field displayed in the “Sort Fields:” list and choose to apply either an “Ascending” or “Descending” sort order to the selected field by clicking on the desired option button in the “Sort Direction:” section.
If you need to sort the data by more than one field, you can then repeat the process for the next field by which you want to sort the data in the “Available Fields:” list. Note that if you have multiple fields by which you are sorting the data, then the small black “up” and “down” pointing arrows appear in the upper right corner of the “Record Sort Expert” dialog box. You can click on a field listed in the “Sort Fields:” field list and then click the “up” and “down” arrows to move the selected field up and down to reorganize the order in which the fields are sorted.
If you wish to remove a field from the sort list, click on it to select it from the “Sort Fields:” list at the right side of the “Record Sort Expert” dialog box, and then click the left-pointing arrow button to remove the selected field from the “Sort Fields:” list.
When you are ready to apply the sorting displayed in the “Record Sort Expert” dialog box, click the “OK” button to apply the selected sorting.
You can use the “Group Expert” to create groupings within your report by which you can view subtotals and sort the report data. For example, let’s assume that you were requested to create a report that shows employees sales with totals by employee. Oftentimes, when you state the purpose of the report you will notice that you wish to see the data “by” some field. The word “by” is often an indication of by which field you will want to create the groups in your report. When you create groups based on the value of a field, Crystal Reports will group together all of the exact same values found within the selected field. You can then perform additional calculations over the groups established, like sum the value of an “Amount Sold” field for each unique grouping of values in an “Employee ID” field. Grouping by data fields makes these types of summary calculations possible.
In Crystal Reports, you can use the “Group Expert” dialog box to create the groupings necessary for your report and set any additional options you may wish. You can launch the “Group Expert” dialog box by either clicking the “Group Expert” button in the Experts toolbar or by selecting “Report| Group Expert…” from the Menu Bar.
In the “Group Expert” dialog box, you can click on the name of the field by which you want to create the first group in the “Available Fields:” list. Then click the single right-pointing arrow to move the selected field over into the “Group By:” list. You can then click on another field in the “Available Fields:” list and click the same arrow again to move it to the “Group By:” list at the right side of the dialog box, if you need to create another grouping within the first grouping. Note that the sub-groupings appear indented below the previous grouping above them. If you wish to remove a field by which you are grouping within the “Group By:” list, click on its name to select it and then click the single left-pointing arrow to send the field back to the list of “Available Fields:” at the left side of the dialog box.
If you added the fields by which you want to create the groupings to the “Group By:” list at the right side of the dialog box in the incorrect order, you can easily rearrange the order of the fields listed by clicking on the name of the field in the “Group By:” list and then clicking the small “up” and “down” arrows in the upper right corner of the dialog box to change the order of the grouped fields.
You also can set the properties of the data fields in the “Group Expert” dialog box. Just click on the field for which you want to set grouping options in the “Group By:” list, and then click the “Options…” button at the bottom of the list. That will launch the “Change Group Options” dialog box. There are two tabs here which you can use to set the group properties: the “Common” tab, and the “Options” tab.
If you click on the “Common” tab, you will be presented with the name of the field by which the groupings will be created displayed in a drop-down box. Below that you have another drop-down that displays the four different options that you have for sorting data. You can select to sort the groups in either “Ascending” (A-Z, 1-10) order or “Descending” order (Z-A, 10-1). You can also select to leave the records sorted “in original order,” which will exempt the groups from any artificial sorting. If you select the “in specified order” option, you will add and display the “Specified Order” tab. Here you can create a specified order by which to sort the groups that is neither ascending nor descending.
On the “Specified Order” tab, you can create the custom sort order to be used for the group. You can use the “Named Group:” drop-down to choose a value from the field by which you wish to sort, if the field contains a value by which you wish to create the groupings. You can select multiple fields from this drop-down, if needed. Each field that you select is added to the list of values displayed below. You can change the sort order of the values in this list by first clicking on the value whose position in the list you wish to change. Then click the small black “up” and “down” arrows to the right of the list to change their position within the list values.
You can remove a field value that you have added by to the listing of values by selecting the value to remove and then clicking the “Delete” button below the list. You can add a new value by which to sort the displayed results by clicking on the “New” button below the list of values. This will then launch the “Define Named Group” dialog box. Here you can type a name for one of the values in your group into the “Group Name:” text box at the top. You can then specify a filtering criteria by which items will be placed into the named group that you created. When you are finished creating the group, click “OK” to add the group to the list in the “Specified Order” tab.
If you select a range of records which you will then reference as a single named group in the “Specified Order” tab, then you should indicate what you will do with the rest of the non-selected records on the “Others” tab. When you click the “Others” tab, you can set your desired option: “Discard all others,” “Put all others together, with the name:,” which you can then type into the box provided, or “Leave in their own groups.”
Back on the “Common” tab it is worth noting that if you have a date field selected for the grouping, then you will also see another drop-down appear under the listing of “The section will be printed:.” Here you can choose the date grouping that you wish to use for your selected field. If you have a logical (boolean) value selected for the grouping, then you will see a drop-down that gives you options for creating groups based on the logical values.
Finally, you can click on the “Options” tab to set other available options for the grouped field. Normally when you create field groupings in reports, you will see a new “group tree” pane at the left of the report that you can use to jump to the various sections of the report. You will also typically have a group header and group footer where you can see the names of the groups in your report. By default, the group name fields have the same values as the group field. You can check the “Customize Group Name Field” checkbox to specify the group name field as either a database field or a group name formula that returns a string (text) value that can be used for the group name field. For example, you could group by the “Employee ID” field, but display the “Employee Name” for the group field name, if desired. To select a database field, use the drop-down to choose which fields values to display for the group name field from the drop-down available.
If you wanted to, you can also choose the “Use a Formula as Group Name” option and then click the “X+2” button to create a text formula that you can use for the values. We will discuss creating formulas later in class. Note that you cannot choose to customize the group name at all for fields that are sorted in “specified order.”
You can also check the “Keep Group Together” checkbox to try to keep the groups that are created from breaking across multiple pages, if possible. You can check the “New Page After” checkbox to create a new page after a specified number of visible groups have appeared. You can also check the “Repeat Group Header On Each Page” checkbox to allow groups that do break across multiple pages to repeat the group header information for each page.
Once you have set any options for the selected field by which you are grouping, click “OK” in the “Change Group Options” dialog box to return to the “Group Expert” dialog box. Then click the “OK” button in the “Group Expert” dialog box to apply the selected groupings to the report.
Notice that when you create groupings within a report, Crystal Reports will then create a “Group Header” and a “Group Footer” for each field by which you grouped both above and below the “Details” section in the “Design View” of the report. If you have added multiple field by which you are grouping, then you will see multiple group headers and footers, labeled “Group Header #1:,” “Group Header #2:,” and so on and so forth. Also, Crystal Reports will add the group name (as you specified it when setting the options) to the “Group Header” sections. Remember that data placed into the “Group Header” will repeat at the top of each unique value within the group that was created, and data placed into the “Group Footer” will repeat at the end of each unique value in each group.